Monday, 23 July 2012

A tale of half a million photographs

Well, this week has been busy! After a couple of issues with one of the batteries, the AUV team managed to get Autosub working perfectly again and we've been conducting photographic missions to the seafloor over the last five days, covering a survey track approximately 150km long and taking over 500,000 photographs in the process! It's the biggest AUV survey of an abyssal  region conducted to date (to the best of my knowledge) which is very cool and I'm hoping it will allow me to examine the distribution patterns of fish on the seafloor.

Autosub6000 being launched!
(I love that they've had to write 'harmless scientific instrument' on it in case it's mistaken for a giant yellow torpedo!

Deep-sea fish (particularly abyssal ones) are pretty difficult to study, partly because as the depth increases there's less and less food available which means fewer and fewer fish are able to survive. So, by the time you reach the abyssal plains at 4000-6000m, there are relatively few individuals around to find. One way around this problem is to use baited camera systems to lure the fish into your photographs, and it is an extremely efficient way of assessing the abundance and diversity of scavenging species in an ecosystem. However, scavenging species only account for around 25% of the  total fish diversity in the deep waters of the north-east Atlantic, so we need to use other techniques to identify the other 75%. A potential solution is to use unbaited cameras (such as Bathysnap), set to take images every few hours over several months then record which species pass by the camera in that time. Alternatively, we could catch specimens using trawl surveys to cover a larger area (which has the additional benefit that we can get definitive identifications for the species we catch), but we can't tell exactly whereabouts each fish was captured along the trawl's path.


However, none of these methods are really suitable for examining what the distribution patterns of fish are on the seafloor (i.e. do they cluster together or are they spread evenly over the seabed?) or how they respond to variations in habitat (e.g. how they react to the presence of hills or hard substrate), which are fairly fundamental questions to consider in understanding the ecology of any species. This is where Autosub comes into the picture. 

The forward-looking camera & flash on Autosub which  I use to look for fish.

As an AUV (Autonomous Underwater Vehicle), Autosub can be programmed to dive to the seafloor, follow a survey route while operating any on-board equipment (like cameras or sonar systems) and then return to the surface and the research ship without requiring any human intervention during its mission. Not only does this free the ship to conduct other work while the Autosub is getting on with its surveys, but it can also be programmed to conduct extremely long or complex surveys which may not be feasible using other methods. For our work, Autosub was set to conduct photographic transects roughly 35km - 90km in length, taking photographs every 0.86 seconds at a speed of around 1m per second. In case your mental arithmetic is a bit creaky, that's approximately 4200 photographs per hour! 


EDIT: Hooray! I've had the OK to post a few images, so here are a few of the better ones. They're cropped from a 5MP camera so they're not amazing quality, but they do the job!


Bathysaurus sp. (lizardfish) is an ambush predator with rather a lot  of teeth. They're not really orange, but the camera has a funny colour balance going on that I've not fixed yet.


A (not-colour-corrected) grenadier from yesterday's mission.


And another little grenadier from the first mission we did.


Anyway, after a rather full-on five days or so of AUV operations and between the two stills cameras mounted on Autosub, we've amassed well over 550,000 images and covered around 150km of abyssal seabed! A preliminary look through the photos is showing a decent number of fish as well which is brilliant news and means I'm going home with a really nice set of (pretty damn exciting) data! All of this is exceptionally cool, but sadly combines with the 100 hours of ROV footage from last month's cruise to sound the final death knell for my social life. Well, that and the prospect of several weeks on an Angolan oil rig at the end of the year, but that's still to be confirmed...

Examples of the rubbish we trawled up from the Porcupine Abyssal Plain during last year's cruise.
One thing that takes the shine off all this cool and exciting research though is that despite the fact that we're conducting surveys in 5000m of seawater in an area which isn't commercially targeted for anything (no fishing, mining, oil drilling etc.), we're still seeing litter everywhere, from planks of wood and scraps of metal to canvas bags to old books and old drinks cans and bottles. Last year when we were out here we trawled up boots, bottles and twice as much spent fuel (clinker) as animals by weight. It sucks. You'd think that maybe somewhere as remote as the ocean abysses might just be far enough away from us that they'd still be relatively pristine, but it's certainly not the case out here.


Finally, Jen Durden and I have written up a blog for the NOC's 'Picturing the Deep' blog which will hopefully go up online tomorrow (Tuesday at the latest I'd expect) so you can see some of it there at least in the meantime! 


Monday, 16 July 2012

Compressing Confectionery at 5000m

Because most of the research I do is largely based on survey work with a dash of theoretical modelling, I don’t get to spend a lot of time working in the lab or designing experiments. However, this time I came to sea armed with a plan!


Mmmmm.... Sciencey!


As you may remember from previous cruises, people typically spend a lot of their downtime drawing designs on polystyrene cups, sending them to the seabed and letting the high pressure of the seawater crush them into miniatures. After making plenty of my own cups, the novelty began to wear off a bit and I started wondering what would happen to other things if you sent them into the abyss. In particular, I wondered what would happen to air-filled chocolates.

So, before I joined the ship I bought myself a bag of fun-size sweets containing Maltesers, Milky Way Stars, Milky Ways, Mars bars  and Starburst (or Opal Fruits if you’re still determined to remain old skool about it). With the exception of the starburst, all of them contain air-filled spaces to a greater or lesser extent, and although I didn’t formally measure the volume of air in each type, I would estimate that the maltesers have the most air with starburst having the least. I would have also liked to have sent down Aeros and Wispas to see what happens to them, but my local supermarket has a crap selection and this was all they had in the mini-sizes. Now, on to the science part!

Hypotheses
  • The high pressure of the abyss (approximate 480 atmospheres) will crush the Maltesers and Milky Way Stars (being relatively brittle) completely. (Null hypothesis: Maltesers and Milky Way Stars will not crushed by the pressure.)
  • The high pressure of the abyss will cause the Milky Ways and Mars Bars to shrink by reducing the volume of air in the nougat. (Null hypothesis: Size will remain the same.)

I didn’t really expect anything to happen to the starburst since there are no gas-filled spaces in them, but it seemed a shame to leave them out so I chucked them in as well. For science!

Study Design

Deploying the sock

Using fun-sized packets of sweets was a handy way of getting a reasonable number of replicates without wasting large quantities of chocolate to do it (which is virtually a cardinal sin when you’re at sea for a long time!). The packets were divided into experimental and control groups as shown in table 1. The experimental packets were wrapped in a plastic bag and placed into our handy sock* which was then cable-tied onto the frame of the megacorer.  The control groups were placed in a walk-in fridge set to 4°C (the temperature of abyssal seawater).

Figure 1: The test chocolates (below) and controls (above)


Table 1: Numbers of each type of sweet used in the experiment
Confection Type
No. Experimental Packets
No. Control Packets
Maltesers
2
1
Milky Way
3
1
Mars Bars
3
1
Milky Way Stars
3
1
Starburst
2
1

The megacorer was then deployed and sent down to approximately 4800m on the Porcupine Abyssal Plain before being recovered. The total trip took around 5 hours from leaving the deck to coming back on board. Once the sweets were back on the ship, the packets were opened, photographed and tasted by a (semi-) willing panel of curious masters students. 

Data Analysis

The students were delighted at the prospect of eating salty, wet chocolate.

The data analysis comprised two parts: qualitative observations and taste-tests of the experimental sweets compared to the control groups and comparative measurements of the lengths of each of the sweets. Because there is only one Milky Way or Mars Bar per packet, the lengths of these were recorded both before and after the experiment to compare the change in length. The Maltesers, Milky Way Stars and Starburst could not be effectively measured prior to the experiment since that would have required opening the packets, but since there are several individual sweets per packet that was not considered a problem.

The measurements of Mars bars and Milky Ways were made using calipers (without opening the packet), and all other measures were taken from the photographs using photoshop.

Results
General Observations
Although none of the packets had visible holes in them, seawater did manage to get into all the experimental sweets. Aside from making the taste tests more salty that we generally like, it also makes it hard to separate the effects of melting vs. pressure.

Mars Bar

Figure A: Mean lengths of the control vs. experimental Mars Bars. Error bars show one standard deviation, p > 0.05.

Figure B: An experimental Mars Bar (below) after the experiment showing no visible damage compared to the control bar (above).
The Mars bars showed no significant change in length as a result of their journey to the abyss (figure A; paired t-test: p > 0.05) and displayed virtually no signs of crushing damage at all (figure B) and the consensus on taste agreed that they tasted pretty much exactly the same as the control bar.

Milky Way

Figure C: The lengths of control and experimental Milky Ways before and after the experiment. Error bars show one standard deviation, p > 0.05.

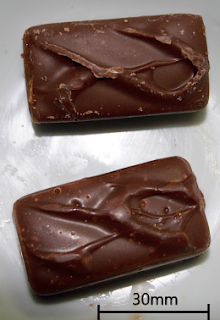
Figure D: Milky Ways appeared to sustain more damage from the pressure than the Mars Bars.

Just like the Mars bars, the Milky Ways showed no obvious change in length after the experiment (figure C), but there were more obvious signs of having been crushed by the pressure (figure D). The taste panel agreed that the experimental Milky Ways were 'wet and disgusting'.

Maltesers

Figure E: Control Maltesers (left) compared to an experimental set (right).

As expected, the journey to the abyss had the most dramatic effects on the Maltesers which were so crushed from the trip that the experimental ones couldn't be measured (figure E). Strangely enough, these were popular with the tasting team who agreed that despite the fact that they were wet and rather salty, they were actually quite pleasant in a strange, chewy way. 

Milky Way Stars

Figure F: Experimental (left) compared to control (right) Milky Way Stars. Funnily enough, no-one was willing to try eating the experimental ones.

Figure G: Mean lengths of Milky Way Stars from each packet. Error bars show one standard deviation, p < 0.05. 
These were badly affected by water leakage and resembled a weird chocolatey soup (figure F). One of the experimental packets contained chocolates that were significantly smaller than the control (figure G; GLM: p < 0.05), but the other experimental groups showed no difference. Not surprisingly, we drew the line at tasting these and so we'll never know if they were still edible!

Starburst
Figure H: Mean width of control (red) and experimental starburst. Error bars show one standard deviation, p < 0.05.

Figure H: Experimental (left) compared to control (right) starbursts.
Figure I: An opened starburst showing the extent to which they had dissolved. 
Finally, we have the starburst. These were also badly affected by water leakage which turned them into a strange soup. Measurements taken on the wrapped sweets showed that the experimental groups were significantly wider than the control (figure H; GLM: p < 0.05), but this is likely due to the fact that they were pretty well liquefied by the time we got them (figures I & J). As with the Milky Way Stars, no-one was willing to try eating these so what salty, wet, melted Starbursts actually taste like will sadly remain a mystery.

Conclusions
It's pretty clear from this short study that the biggest issue with sending Mars funsize sweets into the abyss is non-waterproof packaging, which was generally considered a bad thing in terms of the appeal and taste of everything except the Mars Bars which seemed to be entirely unaltered by the whole affair. The effects of pressure weren't particularly exciting on anything except the Maltesers which seem to have been completely crushed by their descent to 4800m. 

Also, although students will eat almost anything, it seems that salty, melted chocolate soup is a step too far!

Thanks
Thanks to Claire, Alice, Tish and John for daring to taste these!


* Socks make useful impromptu containers because: a) SOMEONE always has an old sock they don’t mind sacrificing to the cause and b) it’s relatively easy to shove cable ties through wool.

Thursday, 12 July 2012

Pilot Whales!

So yesterday was a pretty cool day! Sometime just after lunch we got a call from the bridge that there were pilot whales just beside the boat. As usual, there was a mad dash upstairs to try and see them before they disappeared off into the depths again, but it turns out we needn't have worried too much as the group stayed with us for the best part of an hour. 


Whale sightings tend to bring everyone out onto deck!

The species of pilot whale we get in temperate waters is the long-finned pilot whale, Globicephala melas which belongs to the group 'Odontoceti' or 'toothed whales'. Pilot whales are fairly common offshore, and I've seen them on most of the deep-water research cruises I've been on, but they don't tend to be a particularly active species, and they seem to spend a lot of time resting at the surface. It's always cool to see them, but you don't really get very exciting photographs when they're just relaxing! Yesterday we got lucky though and the group not only stayed with us for ages, but they were also actively diving and spy-hopping and also had a lot of very young calves with them. The calves were brilliant to watch as they were noticeably more exuberant and slightly more clumsy than their parents in the water, but also couldn't dive for nearly as long as the adults which helped us keep track of them as they moved around. Because the weather was a little rougher than normal yesterday too it meant that the animals were sticking their heads much further out the water than they usually do to breathe which meant we could get some really clear views of their faces. Anyway, without further ado, here's some of the best ones:


Pilot whale group. You can see from the fin sizes that there are a lot of  young animals present.

Popping up to breathe

All surfacing at once

And, my personal favourite (I am extremely chuffed with this photo, it took a lot of waiting to get it!):

Calf surfacing beside its mother.

The calf in that last photo was still young enough that you could see the foetal bands on its flanks, which are essentially caused by folds in the skin when the calf is still inside the mother's womb. They'll fade over time, but give an indication that this is still a very young animal, probably no more than a few weeks old.

Wednesday, 11 July 2012

The internet's back on! Time for a blog...

And so, after 4 days of travelling, we finally made it to our sampling stations in the Porcupine Abyssal Plain first thing on Sunday morning ready and excited to start working! ...At least the morning shift were up and ready to go - my afternoon (1500-0300) shift was a little slower to get out of bed, most of us just managing to get ourselves up in time to eat lunch! Still, I can't complain; doing the backshift is DEFINITELY the better option compared to having to get out of bed at 3am every day (I don't do mornings). 

It is quite interesting seeing how different people deal with the shifts though. Most people on board I think would prefer to work the 1500-0300 shift if they had the choice, but some definitely deal it better than others. For me, if I had to get up for 3am I would still wake up feeling like crap no matter when I went to bed, whereas working the backshift until 0300 is absolutely no problem and only took a day or two to get used to. It's also helping the productivity (well, that and the extremely intermittent internet connection means I can't get too distracted too easily!), which always helps ease the PhD Fear back a little bit!

Mud + Science = Fun times for all.

Anyway, aside from settling into our shifts and getting to know everyone else on the ship, we've been getting stuck into a lot of megacoring work, which basically involves sending a corer to the seabed armed with 8-10 plastic tubes, which will be forced into the seabed then mechanically sealed up and hauled all the way back up ready to be measured, cut into slices, preserved and stored. All in all, the whole cycle takes around 7 hours (5 hours to send the gear down and back up and about 2 hours to process) so there's plenty of time to escape off to do some work or watch a film in between cores (or bizarrely, learn how to play cribbage), which is nice because it's not the most exciting work! It's one of those team-effort type jobs though so it's a pretty good laugh at least.

Autosub on the back deck. 

Autosub (our AUV or 'Autonomous Underwater Vehicle') is still being prepared for it's first launch later this afternoon (Wednesday) so keep your fingers crossed that it all goes well! The plan for the next few days is to send it down to take a few test photographs on the seabed so we can make sure it's all working the way it's meant to, and then it will rise up to about 100m off the sea floor and conduct the first part of an acoustic mapping survey which will take about 6 days to complete. So there won't be any fishy photos to look at for a while yet I'm afraid!

A little mystery tern floating by on its own private polystyrene island. Click to enlarge.

In wildlife news, there hasn't been much in the way of bird life out here except for this little mystery tern which floated past the ship yesterday on a little polystyrene island. As usual, I've got very little idea what this is, but it doesn't look like any of the British species I've seen before. Anyone out there got any ideas?

Maybe a fin whale? A group of about 5-6 whales passed our ship yesterday but no-one could tell what species they were.

We also saw a lot of whales yesterday too, which was very exciting! They were pretty far away, but they were pretty big (one was probably >15m, though I'm horrible at estimates. Definitely bigger than a minke though) and we think they might have been fin whales. One day I'll buy an ID guide and be able to say for sure what all these things are that we find out here!


Friday, 6 July 2012

Guide: How to Take Photographs at Sea

Taking your camera out with you on a boat is an excellent way to get up close to marine creatures in their natural environment, but also poses a unique set of challenges both for the photographer and the equipment. As you can probably tell, I’ve spent an awful lot of time working at sea which has given me some amazing opportunities to see and photograph some stunning marine animals in their element. In this short guide, I list my top 5 tips for taking better wildlife photographs while you’re at sea

1.  It’s going to be wet, so prepare your gear before you go
If you’re going out to sea, it’s going to be wet! Even if you manage to get out on a beautiful clear day, with no waves and no rain it’s often much more humid out on the water than on land so make sure you and your equipment is prepared. If your boat doesn’t have a dry area on board, then taking a drybag or waterproof case of some sort is a must so you’ve got somewhere safe and dry to store your gear when you’re not using it (or for when it starts to get wavy and the rain comes on!). If you intend to do a lot of photography at sea, then it’s well worth investing in weather-sealed equipment to avoid the worst of the long-term corrosion that comes with photographing in salt spray, but it’s not something to worry too much about for the occasional trip. I still own a (not weather-sealed) Canon 400D which got completely swamped by a wave once while it was round my neck (it was a case of save myself and soak the camera or fall in the sea) and it’s still working perfectly well now after a bit of a towel dry and some time near a radiator! If you can do, it’s worth trying to make as few lens changes as you can and do them as quick as you can (especially if you’re exposed on deck) to avoid allowing the dampness and salt inside your camera body, but it’s not something that’s worth losing sleep (or good photographs) over unless you’re likely to get rain or spray in there.
It’s also worth mentioning that it is ALWAYS colder at sea than you think it will be, so pack decent waterproofs (jacket and trousers) and warm layers so you can spend as much time outside as possible. A decent pair of walking boots or outdoor shoes are also great for keeping your feet dry and giving you grip on the deck.


2. Manual mode is your friend
Having my camera set to manual (and ready to go) meant that when this whale appeared unexpectedly next to our ship I was ready to get the photograph and didn't need to worry about the camera settings.
With a bit of knowledge about the behaviours of different species, it is possible to predict when the most interesting  shots will happen.
This one’s pretty important since boats are only ever going to provide an unstable platform for shooting from, but there are a few things you can do which will help:
Rough seas and expensive cameras are rarely a good combination...
Leaning against something sturdy will help balance you against the swell.
Seasickness: Seasickness is probably one of the worst feelings in the world and is said to come in two stages: the first stage, when you’re afraid you’ll die, and the second, when you’re afraid you won’t! There are a LOT of different ways to avoid seasickness, and the ones which work are different for different people. There are a lot of over-the-counter tablets that you can buy (I like Stugeron because I don’t get side effects with it, but other people find it makes them too drowsy), but I think one of the most important things is to make sure you eat before you get on the boat. Having a bit of ballast in your stomach does the world of good and is the one thing I’ve heard a lot of people talk about when we’re at sea for long periods of time – not eating properly is about one of the worst things you can do to yourself! Similarly, make sure you drink plenty of water. Some people (myself included) find ginger can help settle their stomach (in whatever form you prefer – crystallised, tea, biscuits, whatever!), and of course, watching the horizon (or the wildlife) also helps make you feel a bit more steady. And if none of that works, lying down somewhere quiet for a while often helps.
5.Stay Safe
This is absolutely the most important thing. If you fall out of a boat into temperate (e.g. UK) waters, the sea temperature is low enough year-round to kill you from hypothermia pretty quickly (and it will ruin your camera!). At the end of the day, it’s not worth falling in the water for a photograph so use your common sense – wear a life jacket, and if there’s any doubt that you might not be able to keep your balance and shoot, don’t shoot.


The exact settings you apply to your camera are going to vary hugely depending on what you intend to shoot, whether it’s birds in flight, people working on a boat or seascapes for example, but there is one thing that I find enormously useful regardless of the photographic subject and it is setting my camera to full manual mode. I understand that the idea of using manual settings can seem overwhelming initially (it was years before I gave it a try), but once you get used to it, it makes photography at sea far, far easier. Essentially, putting your camera into manual means that you choose the aperture, shutter speed and ISO yourself to produce the exposure you’re looking for. When I started out, I shot exclusively in aperture priority mode, keeping the aperture as wide as possible and usually leaving the ISO around 400 to keep the speed up. The camera would meter the scene (usually using spot metering) and would adjust the shutter speed (and therefore the exposure) itself. This is fine under most circumstances, but becomes an enormous pain in the ass if you’re trying to shoot a bird in flight which keeps crossing above and below the level of the horizon (which most do with ridiculous regularity). Because the sky is very bright relative to most birds and certainly to the sea, as the bird flies you have to constantly adjust the exposure compensation to adjust for the changing background (not necessary if you can keep the subject bang on centre all the time, but I’m not that good!). Anyway, I eventually decided that this was far too much work, made the plunge to using manual and never looked back! Using manual, you can take a couple of test shots to make sure you’ve got the exposure correct, then (providing the light doesn’t change by much) you can ignore it the settings completely and just focus on taking pictures. It also allows you to respond much faster to photographic opportunities because your camera is always ready to go. As long as you remember to check the exposure is still correct when the light levels change it’s dead easy.
3. Know your subject


This is good advice for photographing any wildlife. If you can, try and do a bit of research before you go, so you know which species you are likely to see in an area, what they look like and what their common behaviours are (for example, knowing how different seabirds feed in the water will help you anticipate when and how they will strike the water, allowing you to take a more exciting shot). It will also help you decide if you’re causing a disturbance to the animals, and when you should back off. If you can’t do this in advance, most boats offering wildlife trips will have guides on board (who are often qualified marine biologists) who will be more than happy to talk to you about the different species. Similarly, you can learn a lot about the behaviour patterns of different species just by watching them for a short while, so if you are seeing a lot of one particular species it is often extremely beneficial to observe them for a bit without trying to photograph them. Most species have highly repeated behaviour patterns and once you know what you’re looking for, it’s possible to predict when a gannet is about to make a dive, or when a fulmar is about to take off for example. Similarly, different animals have different ways of flying around boats – gulls and fulmars might glide alongside a boat for a while, but often do it in stages between flying and resting on the sea surface, while kittiwakes will fly in a figure-of-eight pattern behind a boat until they get fed up. Being able to predict how an animal is going to behave will massively help your photography by allowing you to anticipate when the best shot will happen.
4. Get your sea legs on!
 
• Check the weather: Given typical British weather, it’s not always possible to predict what conditions will be like on the day, especially if you’re booking a trip well in advance. Still, if you are able to choose what days you go out on, it’s generally best to start with calm days until you get the hang of things. I generally find that XC Weather gives excellent forecasts for coastal areas and is well worth checking out before you go. 


 Brace yourself: How much a boat moves around will generally depend on its size and how far from shore you’re travelling. Typically, the further from land you go, the bigger the swell will get and the bigger the boat you need to stay stable (there are always exceptions, but it’s a good general rule). If your boat does start moving around, it is usually possible to brace yourself against something for a bit of extra stability, but make sure you keep the camera strap around your neck in such a way that you can drop the camera quickly if you need to hold on. Tuck your elbows into your sides, keeping one hand on the camera body and shutter release, and the other under the barrel of your lens. Standing with your feet apart and knees slightly bent will allow you to use your legs to absorb most of the motion, and standing at about a 45 degree angle to the waves seems to work pretty well. A good, grippy pair of boots is a must for helping you keep your balance.


Thursday, 5 July 2012

To the Abyss!

The tug boat maneuvering us out of port and away from NOC

Leaving Southampton behind us (click to enlarge)


And we're off! After a relatively calm day yesterday to arrive and get acquainted with our new living arrangements aboard ship, we finally left Southampton harbour at lunchtime today, heading out on our way to the abyss! So far we've not really had much to do aside from going through the normal start-of-cruise safety and science briefings, and getting to know the other scientists and the ship so it's been quite a relaxed couple of days (which is a nice break after the chaos of preparing for the cruise!).

We have old skool life jackets!

Inside the life raft, listening to why abandoning ship would be all kinds of horrendous.


We've got a long way to go to get to our study site in the Porcupine Abyssal Plain (PAP), which means we'll not be arriving until first thing on Sunday, with a stop-off en route on Saturday to collect some 'shallow' mud and water samples (from only 1000m!) for one of the other PhD students. Saying that, there's plenty of preparatory work to be done to make sure all our equipment and computers are working properly and that we're ready to cope with the deluge of data we're expecting to get from the AUV on a daily basis. All being well, I'll have amassed an absolutely enormous collection of photographs by the time we come home (current estimates suggest we'll be getting 40,000 photos per day from each of the two cameras), and will have photographically and acoustically mapped an area of seabed of approximately 50km2, making this the largest and most detailed attempt to map a deep-sea area ever conducted! Hopefully with all those photographs I'll get to see plenty of fish!

Southampton harbour (click to enlarge).
In slightly different news, I've also been asked to keep the official NOC blog up to date as we go through the cruise, so if reading one blog by me isn't enough, you can pop over to http://picturingthedeep.blogspot.co.uk/ and read that one too! Though in fairness, the NOC one will be written by lots of different people, so you'll at least get plenty of variety!

Tuesday, 3 July 2012

Heading back to sea!

I still can't quite believe I'm getting to spend so much time on research cruises this year! It's all very exciting! After the success of the Changing Oceans 2012 expedition which I was involved with last month, I've managed to grab a brief two weeks on shore before heading off tomorrow to join the RRS Discovery (the 50 year-old one, not the new one!) in Southampton to take part in the AESA cruise at the Porcupine Abyssal Plain (NE Atlantic). To give it its full title, the cruise is called:

Autonomous Ecological Surveying of the Abyss:
Understanding Mesoscale Spatial Heterogeneity
at the Porcupine Abyssal Plain

Which sounds pretty damn cool, doesn't it?

Essentially the aims of this cruise build on work we conducted on the RRS James Cook last August which aimed to collect preliminary data about the distributions of megafaunal animals across the abyssal seabed using an autonomous underwater vehicle (AUV). Unlike an ROV (a remotely-operated vehicle), which is constantly linked to the research ship via a tether cable and controlled directly by operators on-board, AUVs are pre-programmed with a route and details of what instruments to use and when, and then dropped into the sea where they will automatically follow their programming and then return to the surface when they're done. The lack of a tether system means that not only is the base ship able to continue working with other gears while the AUV is in the water, but that AUVs can access areas that are inaccessible to ROVs (e.g. under ice).

Image taken from the NOC website: http://www.noc.soton.ac.uk/aui/autosub.htm

The plan for the AESA cruise is therefore to send the AUV (we're using AUTOSUB) down to the abyss and send it off to conduct photographic surveys of the seafloor to assess how different animals are distributed across the seabed and how they respond to changes in the seafloor habitats (e.g. surrounding and on top of abyssal mud mounds) over a relatively fine scale. As usual, I'll be studying the fish that we see on the forward-facing camera, while others will be studying the invertebrate fauna using a downward-facing camera. Continuous surveying of physical environmental parameters will also be done at the same time. And while the AUV is busily collecting all its data, we can continue to work on collecting, processing and storing... you guessed it! Mud! I can't wait!

Deep-sea mud. Glorious, glorious, mud!

Since the RRS Discovery is the older sister-ship to the RRS James Cook, I'm expecting that we should have some (albeit limited) internet access while we're away, so I will hopefully be able to keep you updated on our progress and any other cool things we see as we go through the cruise. Also, since my research typically involves video & photographic analysis rather than lab work, I've made up a little side project of my own to run alongside the serious science! ... But you'll have to wait and see to find out what it is!

Sunday, 1 July 2012

OpenROV Project

I found this link today via the blog at Southern Fried Science and I've been geeking out about it for a large chunk of the afternoon as a result. I very much want to have a tiny homemade ROV in my life! ROVs (remotely operated vehicles) are essentially extremely versatile underwater robots which are used in virtually every aspect of underwater exploration. Depending on the size of the ROV, they can be used at all ocean depths and may have manipulator arms and other sensors to allow them to carry out precision tasks at depth without any of the risks associated with sending a human being down (either a diver or in a submarine) to do the work directly. At their most basic, ROVs consist of a housing containing electronics and a camera (so the operators can see where they're going), a tether cable (to link the ROV back up to the control computers on the boat), and motors (so the ROV can actually move around). Unfortunately, as useful as these machines are for conducting surveys, they are generally extremely expensive but that's where the OpenROV project comes in.

The OpenROV project. Image from openrov.com  (Photo Credit: Sam Kelly)   

The idea behind OpenROV is to create an open-source ROV which can be built and used by anyone for a relatively low price, but which is good enough to provide useful scientific data. The design they have at the moment is relatively untested, but apparently has a theoretical depth rating of 100m and has enough space to carry a range of extra sensors and cameras depending on what you want to use it for, so it looks like it could be pretty flexible. The designs and software are freely available on their website right now so if you have access to a workshop and a computer you can go and make one today if you wanted to and because it's open source, it's also supported by a worldwide online community who are able to contribute to the development of the project in a very real way, with software coding and testing the different builds. In my view, this kind of project is what the internet is brilliant at - bringing people together from all around the planet to work on an idea and then sharing it for free. Also, if you support it on kickstarter you can get a Jacques Cousteau-style red beanie!

This is one project I'll be keeping an eye on to see how it turns out. As someone with extremely limited abilities on the electronics side of things I'll be interested to see how this works once it's fully tested and ready-built models start becoming available - it could be a very cool piece of kit.