Showing posts with label gannet. Show all posts

Wednesday, 27 March 2013

How to: Photograph Birds in Flight

A flying bird is probably one of the most challenging subjects you can try and photograph, and will require an enormous amount of patience to get good results. However, there are a few tricks and techniques that I have found make the process easier, and I hope they will be of some use to you!


Before you go:
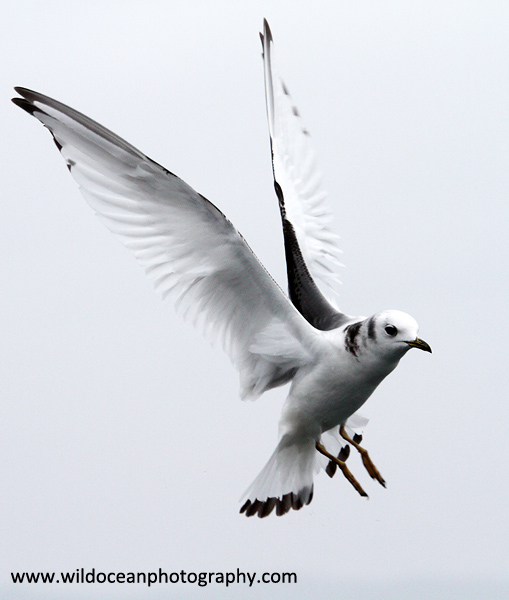
Kittiwakes are great birds to practice on if you can find them as they will fly in a repeating figure-of-eight pattern around the back of a boat as they follow it which makes them really predictable.
  1. Research your subject: You don’t need to predict exactly what species you’ll see on your trip, but it helps to have a rough idea as this will have a bearing on the best kit to take with you - you will need to take a different approach for fast and timid woodland birds compared to ducks at the park for example! Learning as much as you can about the general habits of the bird you want to shoot (e.g. preferred habitat, what it feeds on, what time of day it is most active) will also help you predict what they will do and where they will most likely be when you do get out into the field.

    Knowing the size of the bird, and how close they are likely to come to you are also aspects worth considering when picking your equipment. You may only need a short lens to photograph gulls flying around a seaside town for example, but may require a much longer one to photograph those small finches in a forest. If you know you are only going to have a short time on-site to see some behaviour (e.g. gannets diving at Bass Rock) then spend some time watching videos of it on YouTube or similar so you will have some idea of what to expect.
  2. Set up your kit (and know how to use it!): Birds in flight obviously tend to move very quickly, and you’ll need to be able to adjust your camera settings rapidly to keep up and make sure you get the shot. Which settings you prefer to use are up to you, but I usually set my camera (an affordable and quick Canon 7D) to:
      • Manual Mode: Unless the light levels are changing rapidly, this will make your life MUCH easier as it's one less thing to worry about while you're tracking your subject, particularly if the brightness of the background is very variable.
      • Fast burst shooting: I don't advocate just holding down the shutter button whenever anything happens until your camera buffer fills up, but taking a burst of shots at the peak of the action can often be the difference between a clipped wingtip or a less-attractive posture and a really nice photo.
      • Autofocus on (central point): The central autofocus points are generally more accurate on most (non-professional) camera bodies and I stick to them to ensure a higher 'hit rate' for birds on the move.
      • Shutter speed > 1/1000s: Seriously, this makes all the difference in the world! It doesn't matter if you can hand-hold your camera and long-lens at 1/50s, the pictures WILL look fuzzier than if you get the shutter speed up. If this means you need a higher ISO then use it, but get the speed up as high as you can get it.
      • Aperture: Usually I'll leave this wide open, but I might knock it down to F8 if the autofocus is struggling or if I'm being rolled around a lot like on a boat and I want to make sure the bird's face (especially the eyes) are sharp.
Quick lenses are expensive, but the improvements in auto-focus speeds and smoothness can be worth the cost if you're looking to take your photography more seriously. For most of my wildlife photography, I use the Canon 300mm F4 IS L lens with a 1.4x converter which is absolutlely ideal for what I need. 

In the Field: 
You can use unusual lighting to great effect, but it might not always be what you're looking for! 
  1. Choose your spot: How much you can do this will obviously depend on where you are shooting, and whether you have to stay in a static public hide (as is the case in some nature reserves for example) or whether you have the freedom to move around. Wherever you are though, do make sure and consider your background (is it cluttered? Are there distracting elements?) and the lighting (do you really want your subject to be backlit? Is the target area in bright sunshine or shade?) as well as a good view of the birds you are wanting to photograph. It’s a massive disappointment to find out that you've nailed an in-flight shot, but the shot is ruined by a bit of brightly-coloured litter in the background or too much contrast.
  2. Just Watch: Unless an amazingly rare species pops up or something really unusual is happening, it’s worth spending a bit of time just watching your birds fly. Get used to watching their flight patterns and their general behaviours before you pick up your camera. Most animals display a relatively limited range of behaviours and it's usually possible to learn to predict which actions will precede a fight, take-off, diving or feeding for example. Similarly, different species will fly in very different ways - a heron has a 'lazy', slow flight style, whereas swallows are fast and far more erratic, but will congregate around specific feeding areas. A little bit of patience early on will mean you are in a much better position to predict when and where you are likely to get the shot. Shooting a couple of frames at exactly the right moment is usually better than just keeping your finger on the shutter button taking the 'spray and pray' approach!
  3. Too fast to track? Catch them at a set point: An alternative to tracking a fast bird, or one with an erratic flight path is to manually focus on a particular spot and wait for the bird to enter it. This is much easier if there is a point that the bird is repeatedly flying to (e.g. a food source) so you have something to pre-set your focus on, but with a combination of narrow aperture (for larger depth of field) and a high shutter speed you can get good results (especially if your camera has good high ISO performance!).

    If a bird is flying too fast to catch, try setting your focus manually to a target (in this case , the baby swallow or the bird feeder) and shoot the bird as it enters the frame. A tripod is very helpful to keep the point of focus in exactly the right place, but these examples were both taken handheld.
  4. Be aware of the whole scene: When you are totally focused on a bird in your viewfinder, making sure it is in the frame, in focus and looking lovely, it is very easy to forget the rest of the frame, and what is happening in the background, or to the light levels. If you shoot using one of the semi-automatic settings like aperture or shutter-priority, the camera should make allowances for any changes in the light, but you have to be aware of changes in the background that will confuse it. For example, when shooting seabirds, they quite often swoop and dive around the boats, meaning that the background is constantly changing between a dark blue sea, and a bright, (though usually grey) sky. It is very easy to get the exposure of the bird wrong as a result, and you need to be prepared to keep adjusting the exposure even as you are panning after the bird. This is one of the major reasons I prefer to use manual mode, because it involves a LOT less effort to keep the subject correctly exposed while tracking it!

    Shooting against the dark sea can throw off automatic metering when the bird flies back up and frames itself against the sky. Using manual exposure settings avoids this problem. 
  5. Finally, practice, practice, practice! This is absolutely the most important thing you can do. Once you know your camera and subject, there is nothing better than getting out and practicing with them.
Looking for more photography tips? Check out my other guides on how to compose a great wildlife photo and how to take photographs at sea.


Friday, 6 July 2012

Guide: How to Take Photographs at Sea

Taking your camera out with you on a boat is an excellent way to get up close to marine creatures in their natural environment, but also poses a unique set of challenges both for the photographer and the equipment. As you can probably tell, I’ve spent an awful lot of time working at sea which has given me some amazing opportunities to see and photograph some stunning marine animals in their element. In this short guide, I list my top 5 tips for taking better wildlife photographs while you’re at sea

1.  It’s going to be wet, so prepare your gear before you go
If you’re going out to sea, it’s going to be wet! Even if you manage to get out on a beautiful clear day, with no waves and no rain it’s often much more humid out on the water than on land so make sure you and your equipment is prepared. If your boat doesn’t have a dry area on board, then taking a drybag or waterproof case of some sort is a must so you’ve got somewhere safe and dry to store your gear when you’re not using it (or for when it starts to get wavy and the rain comes on!). If you intend to do a lot of photography at sea, then it’s well worth investing in weather-sealed equipment to avoid the worst of the long-term corrosion that comes with photographing in salt spray, but it’s not something to worry too much about for the occasional trip. I still own a (not weather-sealed) Canon 400D which got completely swamped by a wave once while it was round my neck (it was a case of save myself and soak the camera or fall in the sea) and it’s still working perfectly well now after a bit of a towel dry and some time near a radiator! If you can do, it’s worth trying to make as few lens changes as you can and do them as quick as you can (especially if you’re exposed on deck) to avoid allowing the dampness and salt inside your camera body, but it’s not something that’s worth losing sleep (or good photographs) over unless you’re likely to get rain or spray in there.
It’s also worth mentioning that it is ALWAYS colder at sea than you think it will be, so pack decent waterproofs (jacket and trousers) and warm layers so you can spend as much time outside as possible. A decent pair of walking boots or outdoor shoes are also great for keeping your feet dry and giving you grip on the deck.


2. Manual mode is your friend
Having my camera set to manual (and ready to go) meant that when this whale appeared unexpectedly next to our ship I was ready to get the photograph and didn't need to worry about the camera settings.
With a bit of knowledge about the behaviours of different species, it is possible to predict when the most interesting  shots will happen.
This one’s pretty important since boats are only ever going to provide an unstable platform for shooting from, but there are a few things you can do which will help:
Rough seas and expensive cameras are rarely a good combination...
Leaning against something sturdy will help balance you against the swell.
Seasickness: Seasickness is probably one of the worst feelings in the world and is said to come in two stages: the first stage, when you’re afraid you’ll die, and the second, when you’re afraid you won’t! There are a LOT of different ways to avoid seasickness, and the ones which work are different for different people. There are a lot of over-the-counter tablets that you can buy (I like Stugeron because I don’t get side effects with it, but other people find it makes them too drowsy), but I think one of the most important things is to make sure you eat before you get on the boat. Having a bit of ballast in your stomach does the world of good and is the one thing I’ve heard a lot of people talk about when we’re at sea for long periods of time – not eating properly is about one of the worst things you can do to yourself! Similarly, make sure you drink plenty of water. Some people (myself included) find ginger can help settle their stomach (in whatever form you prefer – crystallised, tea, biscuits, whatever!), and of course, watching the horizon (or the wildlife) also helps make you feel a bit more steady. And if none of that works, lying down somewhere quiet for a while often helps.
5.Stay Safe
This is absolutely the most important thing. If you fall out of a boat into temperate (e.g. UK) waters, the sea temperature is low enough year-round to kill you from hypothermia pretty quickly (and it will ruin your camera!). At the end of the day, it’s not worth falling in the water for a photograph so use your common sense – wear a life jacket, and if there’s any doubt that you might not be able to keep your balance and shoot, don’t shoot.


The exact settings you apply to your camera are going to vary hugely depending on what you intend to shoot, whether it’s birds in flight, people working on a boat or seascapes for example, but there is one thing that I find enormously useful regardless of the photographic subject and it is setting my camera to full manual mode. I understand that the idea of using manual settings can seem overwhelming initially (it was years before I gave it a try), but once you get used to it, it makes photography at sea far, far easier. Essentially, putting your camera into manual means that you choose the aperture, shutter speed and ISO yourself to produce the exposure you’re looking for. When I started out, I shot exclusively in aperture priority mode, keeping the aperture as wide as possible and usually leaving the ISO around 400 to keep the speed up. The camera would meter the scene (usually using spot metering) and would adjust the shutter speed (and therefore the exposure) itself. This is fine under most circumstances, but becomes an enormous pain in the ass if you’re trying to shoot a bird in flight which keeps crossing above and below the level of the horizon (which most do with ridiculous regularity). Because the sky is very bright relative to most birds and certainly to the sea, as the bird flies you have to constantly adjust the exposure compensation to adjust for the changing background (not necessary if you can keep the subject bang on centre all the time, but I’m not that good!). Anyway, I eventually decided that this was far too much work, made the plunge to using manual and never looked back! Using manual, you can take a couple of test shots to make sure you’ve got the exposure correct, then (providing the light doesn’t change by much) you can ignore it the settings completely and just focus on taking pictures. It also allows you to respond much faster to photographic opportunities because your camera is always ready to go. As long as you remember to check the exposure is still correct when the light levels change it’s dead easy.
3. Know your subject


This is good advice for photographing any wildlife. If you can, try and do a bit of research before you go, so you know which species you are likely to see in an area, what they look like and what their common behaviours are (for example, knowing how different seabirds feed in the water will help you anticipate when and how they will strike the water, allowing you to take a more exciting shot). It will also help you decide if you’re causing a disturbance to the animals, and when you should back off. If you can’t do this in advance, most boats offering wildlife trips will have guides on board (who are often qualified marine biologists) who will be more than happy to talk to you about the different species. Similarly, you can learn a lot about the behaviour patterns of different species just by watching them for a short while, so if you are seeing a lot of one particular species it is often extremely beneficial to observe them for a bit without trying to photograph them. Most species have highly repeated behaviour patterns and once you know what you’re looking for, it’s possible to predict when a gannet is about to make a dive, or when a fulmar is about to take off for example. Similarly, different animals have different ways of flying around boats – gulls and fulmars might glide alongside a boat for a while, but often do it in stages between flying and resting on the sea surface, while kittiwakes will fly in a figure-of-eight pattern behind a boat until they get fed up. Being able to predict how an animal is going to behave will massively help your photography by allowing you to anticipate when the best shot will happen.
4. Get your sea legs on!
 
• Check the weather: Given typical British weather, it’s not always possible to predict what conditions will be like on the day, especially if you’re booking a trip well in advance. Still, if you are able to choose what days you go out on, it’s generally best to start with calm days until you get the hang of things. I generally find that XC Weather gives excellent forecasts for coastal areas and is well worth checking out before you go. 


 Brace yourself: How much a boat moves around will generally depend on its size and how far from shore you’re travelling. Typically, the further from land you go, the bigger the swell will get and the bigger the boat you need to stay stable (there are always exceptions, but it’s a good general rule). If your boat does start moving around, it is usually possible to brace yourself against something for a bit of extra stability, but make sure you keep the camera strap around your neck in such a way that you can drop the camera quickly if you need to hold on. Tuck your elbows into your sides, keeping one hand on the camera body and shutter release, and the other under the barrel of your lens. Standing with your feet apart and knees slightly bent will allow you to use your legs to absorb most of the motion, and standing at about a 45 degree angle to the waves seems to work pretty well. A good, grippy pair of boots is a must for helping you keep your balance.


Saturday, 23 June 2012

Review: Canon 7D

So I figured that since I wrote a whole post yesterday on my new Canon 17-40mm lens, this is probably as good an opportunity as any to write in a bit more detail about some of my other gear, starting with my photography kit! Today's review is on the Canon 7D DSLR body.

The Canon 7D
Canon 7D with 300mm F4 IS L lens + 1.4x teleconverter.

The Canon 7D was released a couple of years ago now back in Autumn 2009 effectively as a 'sports' alternative to the Canon 5D Mk2 which was released about the same time. With the 5D Mk2 offering a massive number of megapixels (22.2), a HUGE ISO range (up to 25600) and the same amazing image quality as its predecessor, the 7D had a lot to live up to. By comparison, the 7D has (slightly) fewer megapixels (18MP), a (1.6x) crop sensor, and worse ISO performance. But then again, none of that really matters because this camera is built for speed.

You can read all about the specifications of this camera elsewhere, but the most interesting updates from my point of view when I bought it were the really fast and accurate autofocus (said to rival the AF of the much-adored Canon 1D Mk II) and the whopping 10 frames-per-second (fps) continuous shooting rate. The accuracy of the autofocus was something I was keen to improve at that point, as I'd been shooting with a Canon 40D for a while by then and was finding it frustratingly slow at times, particularly when trying to shoot birds in the chaos that follows behind fishing boats.

First Impressions


I spend two days looking at specks of flying drool and wondering why they weren't sharp enough. Sigh.

My first impressions of the 7D when I bought it two years ago were that it a) sometimes took awesome photos and b) was a far more technical camera than I had been used to up to that point. I spent a few weeks with the manual and testing it out at Caerlaverock WWT reserve on geese and on my (rather quick) dog and his frisbee. Then I spent another few days driving myself crazy looking at 100% crops of the images I was taking and wondering why they weren't quite up to the standards I was expecting. After testing the sharpness of my lenses (all are spot on) and deciding that it probably wasn't the 7D body (results were inconsistent), it turned out to be user error (I was basically using too slow a shutter speed for too-fast subjects!). Interestingly though, I'd written off a lot of soft images from the 400D or 40D as being the fault of the camera and it took the 7D to make me really reassess the way I had been shooting and how to really get the most out of a camera. It probably means I was always a bit unfair on the other cameras I'd had, but it forced me to become a better photographer and to think a lot more about what I was actually doing when I went out to shoot.

Later Impressions
After that rather steep learning curve at the start, the 7D has never disappointed. The AF isn't perfect, and it will miss subjects, particularly when there's low contrast (e.g. shooting grey birds on a cloudy, grey day) or if they're moving fast over a close backdrop (e.g. low flying over the sea) but when it gets a subject (and it will catch on quickly!) it will definitely catch it. One problem I had with the 40D was that it would partially focus on subjects fairly often, but the 7D doesn't do this nearly as much and things tend to be either in focus or completely missed. The 10 fps is also very handy, and although using long bursts will eat up the processing power within a second or two, it can make for some cool time-lapse sequences and if used sparingly, can often make the difference between getting a usable or a completely useless photograph. 

Shot at ISO6400 in the middle of the night with only a ship's light to illuminate the sea. It's not brilliant, but perfectly acceptable as an ID photo.

The ISO performance on this camera is pretty good too. At anything much above about 400ISO, you do really start to notice the graininess coming into the images, which is a bit of a shame but probably fairly inevitable given the number of MP squeezed onto the sensor. Image quality in general though is excellent, and I must admit that the 18MP resolution means you can crop an image in pretty far and still maintain a good resolution image, which is a nice cheat if you can't afford a super-zoom (I can't).

After two years of trying I was finally able to get this shot!

One of the main reasons I wanted a camera upgrade was so I could get a decent photograph of a gannet diving into the water. For whatever reason, I'd never managed to get that shot before with my old gear, but the hit rate went up massively with the 7D, so I'm guessing it wasn't entirely down to human error! Gannets can reach 60mph when they hit the surface of the sea, so they present a pretty big challenge to spot, focus on, track and shoot. Thanks to this camera (and plenty of practice), I was able to FINALLY get the result I wanted!

Environmental Sealing
Shooting a timelapse series of our journey down the Clyde at the start of our last research cruise. My camera's under the hat and the timer is in the rucksack. It was cold.

I thought this might deserve special mention since I've probably done just about everything to this camera short of dropping it or drowning it (and it's come close to the latter). In the two years I've owned my 7D I've taken it out on about a dozen fishing boats, covered it in mud, salt, fish slime and water and battered it off several walls, floors and railings, and in all that time it's never had any kind of issue (not even a dusty sensor). It undoubtedly helps that I almost exclusively use weather-sealed lenses when I'm outdoors but it's pretty reassuring. After all, what's the point in owning something if you can't use it when you want to?

Stuff I never thought I'd use
As you've probably noticed, I've really only talked about the AF and the fps so far, because those were the things I bought the camera for, but there are a ton of other features that I've slowly started to use, even though I never thought I'd bother with them. The HD video is one of those features, and it's still not something I'm using a lot. It has been good fun to play with though and if nothing else is enough to satisfy my curiosity about whether video is something I want to get into a bit more. I wish it had continuous autofocus, but aside from that, seems to be pretty nice!

The other feature I've started using more is the live viewfinder on the back. Not being a macro photographer, I've never really bothered with this as a feature as I prefer using the 'normal' viewfinder (I'm oldskool like that!), but it certainly has it's uses and I've found myself using it increasingly to frame shots at awkward camera angles which is handy. I also understand why people love adjustable live viewfinders!

Summary
Before I bought this camera I used to spend a long time hopelessly lusting after cameras like the 1D MKIII or IV wishing I had something that would just shoot a bit faster or grab subjects a bit quicker. Since owning the 7D I don't think I've bothered to look at any other cameras - this one is still going strong and it provides everything I need in a camera body. The crop sensor, high resolution and really fast speeds all combine to make it an excellent sports or wildlife camera. You don't get quite the resolution or the image quality that you can get with a (full frame) 5D MKII or III, so if those things are important to you, then the 7D might not be the camera you want. If you're after something reliable, super-fast and affordable for shooting fast-moving things then you could certainly do far, far worse.


Wednesday, 20 June 2012

Two Years of Wildlife in the Outer Hebrides

My camera gear gets a pretty rough time when I take it out in the field. If I’m not at the coast on sandy beaches or gloopy mudflats, I’m usually out on a boat of some type in every kind of weather Scotland can come up with. From 2007 to 2010 I spent some time working with some of the trawl fishermen based in the town of Stornoway to study the bycatch (any non-target species) in their catches and to try and figure out ways to make the fishery more sustainable. As a result, I’ve spent quite a lot of time at sea on a couple of the boats which, although it’s been pretty challenging at times (largely depending on the weather!), has also been an amazing opportunity to get up close to a huge variety of Scotland’s marine life amongst some of the most gorgeous scenery in the country!


The area I was working in is called the ‘North Minch’. The Minches are the bodies of water that lie between the northern islands of the Outer Hebrides (Lewis & Harris) and the Scottish mainland, and is approximately the area shown in red on the map below. As with most of the Scottish west coast, this region supports an extremely rich marine community and while I have not yet had the chance to go diving here, the evidence for it from the surface is clear from the numbers of seabirds and marine mammals we saw on each trip. The trawls themselves also gave us a glimpse of some of the underwater life and many of the images in the Marine Identification gallery are of animals caught in trawls from the Minch.

Map showing approximate area of the North Minch
(Image from WikiMedia Commons)

The wildlife you could expect to see in the Minch, as with anywhere, varies throughout the year, and after two years and over 300 hours at sea out there, we were able to piece together a picture of the common species you may expect to see at sea around the Isles of Lewis and Harris over the course of a typical year. Hopefully if you ever visit the islands this will help give you some idea of the wildlife that is around, and that you may be able to see if you explore the coastline from either the land or the sea. Wildlife-spotting boat trips are available on Lewis as well, so you don’t need to brave the fishing boats to get out and see it all!

Spring
Springtime is definitely the season when the wildlife is beginning to warm up in preparation for the summer. The seabirds begin to appear again in force after the winter and the gannets always seemed particularly keen to follow the fishing boats during the spring months, possibly because they provided enough food to tide them over until the plankton bloom brings the shoals of small fish in. Whatever the reason, the gannets were out in force every spring we visited which made it that bit easier to get some good action shots of them.


Gannets are one of my personal favourite birds to photograph, although it took a LONG time to finally get a series of diving shots that I could really be proud of.

A kittiwake displaying its winter plumage

Kittiwakes were always close behind our boat, and many of the young ones were still in their 1st winter plumage. Fulmars and several of the larger species of seagull (like greater and lesser black-backed gulls and herring gulls) were also common around the boats.

Gannets followed the trawlers in high numbers in the spring 

The weather in spring is still cold and the sea state can be fairly unpredictable this early in the year, although the Minches are somewhat notorious for their rough weather anyway! This did mean that it was generally more difficult to spot cetaceans (whales and dolphins) or seals – no doubt they were around, and we did occasionally catch a glimpse of the odd porpoise or get a visit from a scavenging grey seal, but they were fairly few and far between. If you’re looking for marine mammals, wait for the summer! 


Grey seals occasionally made an appearance around the nets, but sightings outside the harbour were a rarity
The unpredictable weather did mean that we were land-bound on a couple of days which gave us a chance to see some of the island and take in the stunning white beaches and rocky coastlines that the Hebrides are famous for. They are not called the ‘jewels of the sea’ for no reason, and a tour of the coast is well worth it. As far as the coastal wildlife went, we saw dunlin, ringed plovers, oystercatchers and a variety of gulls on the sandy shores, along with colonies of fulmars and cormorants and shags on the rocky cliffs to the north. And all that in just a few hours – a more thorough exploration would undoubtedly throw up a lot more.

Rain coming in over Broad Bay (Isle of Lewis)

Ringed plover on the shore

Summer
Summer is probably the busiest time for wildlife and the best time to visit if you are looking for a variety of species and relatively settled weather (at least as settled as Scottish weather ever gets...!). Summer is really the time to see cetaceans, and the Minch is full of them – on our various trips we were lucky enough to see harbour porpoise, common and bottlenose dolphins and minke whales, and we even saw a baby minke whale breaching clear of the water right next to our boat in 2009! There was no chance of getting the camera in time, but it was an amazing thing to see! Getting calm weather massively improves your chances of seeing cetaceans so try and pick a settled day for it if you can, though I’ve noticed that seabirds tend to prefer a bit of wind to fly about in and tend to sit on the surface on calm days. If you’re after birds in flight, a bit of a breeze is a good thing!

Common dolphins playing in the water around the boat.

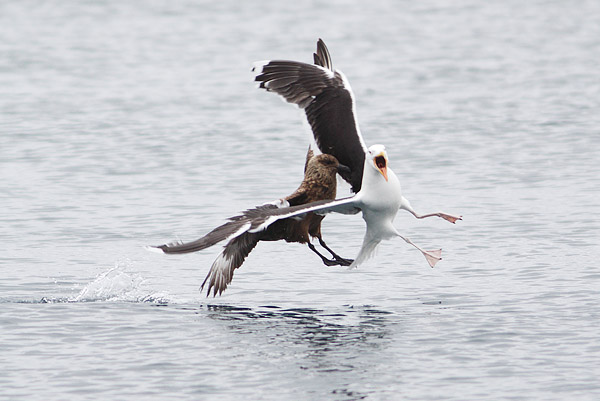
The gannets, gulls, kittiwakes and fulmars are still around at sea, although there appeared to be much more ‘natural’ food in the Minches during our summer visits and the gannets, while still present at the trawlers, were typically seen in far higher numbers feeding on baitballs along the coast. Summer is also the time to see great skuas which are summer visitors to Harris and Lewis (and the Orkney and Shetland Isles). These are powerful birds which are capable of attacking and bringing down birds as large as gannets in order to steal food from them (a practice known as kleptoparasitism) or simply kill them. While we were there in summer 2010 there were quite a few of these encounters, some more grisly than others, but which made for pretty interesting behaviour shots! We had rare sightings of various shearwaters as well, although these birds often stayed too far away from us to identify clearly. These are offshore birds which only return to their burrows on land during the summer breeding season and at night, making them a fairly rare sighting unless you are able to travel relatively far out to sea.


A great skua chasing down a gull.

A great skua in flight alongside our vessel.

A lesser black-backed gull coming in to land on the sea. 

As well as the large predatory and scavenging seabirds, many of the smaller auks were also around, including puffins, guillemots, razorbills and black guillemots. We saw the largest groups of these around the South Shiant islands, which can be visited with some of the wildlife tour boats operating from Lewis.

Autumn
As the autumn comes in, the weather begins to deteriorate again and although it is not as cold as in spring, many of the seabirds start leaving the area, particularly the puffins. Gannets did not seem to be around in such high numbers as in the summer either, although the great skuas were still present during one of our visits in September, as were small numbers of sooty shearwaters. Unfortunately, the weather during our later trips was awful, and I wasn’t able to shoot much. To be honest, I wasn’t able to do much of anything on those days except count the minutes back to land!

A sooty shearwater resting alongside our vessel.

Winter

A gull taking flight over a golden sea at dawn

Winter in the Minch is freezing cold, dark for all but around seven hours of the day and has a tendency to get quite stormy! Having said that, it is a beautiful time of year to enjoy the scenery of the Hebrides and the dawn light is wonderful. By this time many of the birds have moved on, leaving mainly gulls and kittiwakes behind and a few cormorants. There are herons in the harbour and town centre of Stornoway, and we also saw red-breasted merganser in the harbour in February 2009. There is far more light in February than in December once you get as far north as Lewis, and February is generally good for photography if you can dress warmly enough!

Lighthouse at dawn travelling out of Stornoway harbour (taken around 8.30am) 

Young kittiwakes in their 1st winter plumage are a common sight at this time of year 

Dawn over the Scottish mainland. There are far worse sights to see as you start your day!

One place you should always check out though is the harbour, which is home to a resident group of about 10-12 grey seals, which will come in and feed on any discarded catches when the fishing boats come in each evening.

The grey seals in Stornoway harbour are quite happy to eat any waste fish the boats throw away 


Summary
I have no doubt that I have only seen a tiny amount of the marine wildlife that lives on and around the Hebridean Islands, and I suspect it would take a great many more visits to produce a comprehensive listing of everything that lives there! However, hopefully this guide will be of some use if you are planning a trip to the islands and want to see some of the wildlife for yourself. If you would like more information or have any questions about any of my sightings or photographs please don’t hesitate to get in touch at info@wildoceanphotography.com

Monday, 4 June 2012

200 hungry seabirds & the Jubilee


Well, the weather brightened up yesterday and the swell has decreased pretty nicely so it’s looking like we’ll be back on track with the ROV work from today which is good news! Still it’s been pretty cool out here with the heavy weather and although there hasn’t much going on in terms of wildlife that we could really see (except the pod of 20 pilot whales which I missed! Bah!).

Making celebratory Jubilee hats

The bad weather did give us a chance for some hat-making sessions for the Queen’s Jubilee weekend though!

What are you looking at?

Considering that there are 54 people on board the ship, we throw away relatively little food. Meals are one of the daily highlights so people tend to eat everything they’re given anyway, and the kitchen will recycle any other leftovers into new meals for a few days as well so very little is actually wasted. So it’s pretty incredible that we’re currently being followed by an entourage of about 200-300 gulls, fulmars, gannets and skuas, which are apparently getting enough food to make it worth their while to tag along with us. I’ve no idea how much these birds need to eat, but I would have thought a fishing boat would have made a better target for discards and a free meal than us. Still, it means that feeding time for us is quickly followed by feeding time for the birds which inevitably means a few scuffles between the birds and some good photo opportunities for me!

We're being followed by a LOT of birds

This must be worthy of a caption competition!

Fulmars racing for some scraps

Two gulls scuffling over some leftovers

A (far away) skua intercepting a gannet mid-dive.

 I saw my first shearwater of the trip today too, which is nice since it means they’re definitely out there somewhere! I’m still trying to get a good photograph of one, but they’ve been making themselves scarce this trip which is a bit unusual considering they’re usually a fairly common sight. Still, I’ll keep an eye out for them and hopefully they’ll come back over the next few days before we leave.

Tuesday, 29 May 2012

Wind, waves and wildlife!


Well, the good weather finally left us and we’ve had a grey and windy day today which has come as a bit of a shock to the system after all the sunshine we’ve been treated to the last week! Still, it’s great news for photographing seabirds though, as they seem to prefer a bit of wind for flying in to help them glide over the waves, or sit in the up draughts alongside our six-storey  ship. I must admit, it’s been great to be outside on the back deck shooting seabirds in flight again! I think the last time I was really able to stop and shoot seabirds was probably back in 2010 when I was working on the fishing boats. I’ve had a few trips in the meantime obviously, but I’ve been mostly shooting coastal birds for a while now and it’s brilliant to be back out with the gannets again.

The mystery of why there are so many birds around has been solved as well and it turns out that they’re all here making the most of the food waste that gets dumped from the kitchens. All our other waste is either recycled or incinerated on board to minimise the environmental impact of the ship while it’s working, so it’s only biodegradable waste that is put over the side. Still, it’s good enough for the fulmars and gulls, though it’s a little strange watching them fight over bits of watermelon

A gull making off with a chip. That’s a good traditional Scottish diet!

A group of fulmars congregating around the food waste

The fulmars are here in one of the largest groups I’ve ever seen around a ship and there are probably at least 100 of them following us around. I love how at home seabirds are in the oceans regardless of what the sea state is like and it’s great watching them shrug off breaking waves and strong winds like it’s nothing at all.

A fulmar splashing through a wave

A group of fulmars looking absolutely unfazed regardless of how tilty they get

And this one was so comfortable it tucked up and went to sleep

For a little while we were also joined by a few gannets which circled the ship for about an hour or so, gliding around the ship and floating in the air by the bows.

A gannet flying below the bows of the ship

More entertainingly, for some reason every time the gannets landed on the sea they would target a fulmar and force them to rush out of the way. I’ve no idea why they were doing this since nothing was feeding at this point, but I don’t know an awful lot about birds so if anyone else has any suggestions I’d love to hear them!


The gannets liked to use the fulmars as landing pads for some reason