Showing posts with label wild. Show all posts

Sunday, 1 September 2013

Photos from Inverary

I'm back! If you're wondering where I've been, read on. If you just want to see some photos from Inverary, you can skip most of this and head straight down to the images!

So if you've been following this blog at all, you've probably noticed that things here have somewhat ground to a halt over the last three months and I have to admit it's entirely PhD-related. I'm coming up to the end of my 3rd year just now, and courtesy of a (really important) conference in June followed by two months working flat-out in an attempt to meet a self-imposed, unrealistic and unnecessary deadline, my stress levels have been creeping progressively higher for a while now. It's been more or less entirely self-inflicted too, but it's meant that I've not been going out to do the things that I find relaxing (like photography) because I've been feeling too guilty about not working. But then the stress gets higher and your work gets worse and all in all, it's a pretty bad place to be. It's fine when it's short-term, but not so great in the long run. I'm sure pretty much everyone has been there at some point.

Last week got to the point where the workplan clearly wasn't working, so I binned my deadline and went back to working the way that works for me (no Gannt charts!) and instantly felt better. This was also pretty much the point I noticed how crap the last 2-3 months have been, and when I also learned that if I don't want to go out with my camera to photograph wild things because of work, I'm probably working too much!

Anyway, this weekend I got the camera back out for wildlife for the first time since my last research cruise in April(!) and we headed up to Inverary (west coast of Scotland) for a day out with the dog. Since it was an an unusually sunny day the town was pretty busy, but there were still a few birds rummaging around the flats at low water when the dog wasn't charging around! I didn't get anything amazing, but here are a few of the better shots:

There were a LOT of jackdaws on the beach, which is a little unusual - most of the times I've been up that way it's been hooded crows everywhere.

These two had a brief fight over a patch of seaweed, which was over in about 5 seconds!

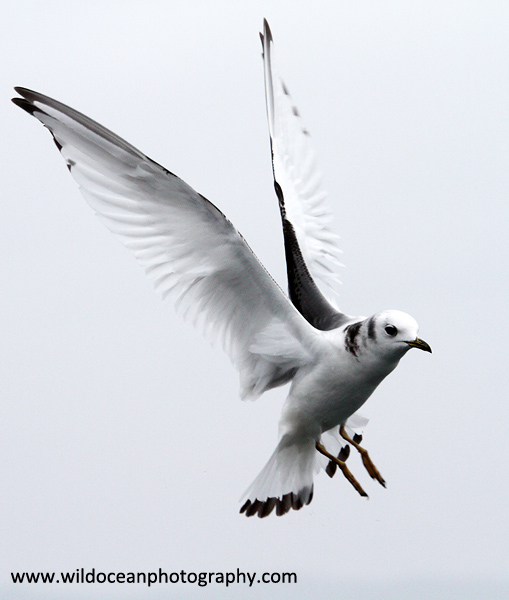
The bright sun didn't make for ideal shooting conditions without a polariser, but allowed for some nice silhouette shots. These are three redshanks and an oystercatcher feeding below the tide line.
Redshanks feeding along the shore.

Until the dog couldn't wait any longer to play in the sea and came to see what I was doing!

Most of the trips our dog gets to the seaside happen when I'm out to take photographs, so it was a pretty awesome day out for him too! Sonny's a rescue dog from the cat & dog home in Glasgow and can be pretty reactive around other dogs, so finding a quiet spot to let him off the lead and play is great!

Sonny
Of course, if I'm taking photos I'm not the one who has to dog-sit. I'm not sure if Kevin had quite as good a day as Sonny and I did!

Heading home via the Loch Fyne brewery, we spotted this small herd of red deer on the hillside too.

So that was our trip out! I'm fully intending to do this more often from now on, so with a bit of luck the blog posts will pick back up again over the next few weeks. Until then, don't forget you can keep up to date with my news and various happenings in the marine world via my facebook page at https://www.facebook.com/wildoceanphotography.


Wednesday, 27 March 2013

How to: Photograph Birds in Flight

A flying bird is probably one of the most challenging subjects you can try and photograph, and will require an enormous amount of patience to get good results. However, there are a few tricks and techniques that I have found make the process easier, and I hope they will be of some use to you!


Before you go:
Kittiwakes are great birds to practice on if you can find them as they will fly in a repeating figure-of-eight pattern around the back of a boat as they follow it which makes them really predictable.
  1. Research your subject: You don’t need to predict exactly what species you’ll see on your trip, but it helps to have a rough idea as this will have a bearing on the best kit to take with you - you will need to take a different approach for fast and timid woodland birds compared to ducks at the park for example! Learning as much as you can about the general habits of the bird you want to shoot (e.g. preferred habitat, what it feeds on, what time of day it is most active) will also help you predict what they will do and where they will most likely be when you do get out into the field.

    Knowing the size of the bird, and how close they are likely to come to you are also aspects worth considering when picking your equipment. You may only need a short lens to photograph gulls flying around a seaside town for example, but may require a much longer one to photograph those small finches in a forest. If you know you are only going to have a short time on-site to see some behaviour (e.g. gannets diving at Bass Rock) then spend some time watching videos of it on YouTube or similar so you will have some idea of what to expect.
  2. Set up your kit (and know how to use it!): Birds in flight obviously tend to move very quickly, and you’ll need to be able to adjust your camera settings rapidly to keep up and make sure you get the shot. Which settings you prefer to use are up to you, but I usually set my camera (an affordable and quick Canon 7D) to:
      • Manual Mode: Unless the light levels are changing rapidly, this will make your life MUCH easier as it's one less thing to worry about while you're tracking your subject, particularly if the brightness of the background is very variable.
      • Fast burst shooting: I don't advocate just holding down the shutter button whenever anything happens until your camera buffer fills up, but taking a burst of shots at the peak of the action can often be the difference between a clipped wingtip or a less-attractive posture and a really nice photo.
      • Autofocus on (central point): The central autofocus points are generally more accurate on most (non-professional) camera bodies and I stick to them to ensure a higher 'hit rate' for birds on the move.
      • Shutter speed > 1/1000s: Seriously, this makes all the difference in the world! It doesn't matter if you can hand-hold your camera and long-lens at 1/50s, the pictures WILL look fuzzier than if you get the shutter speed up. If this means you need a higher ISO then use it, but get the speed up as high as you can get it.
      • Aperture: Usually I'll leave this wide open, but I might knock it down to F8 if the autofocus is struggling or if I'm being rolled around a lot like on a boat and I want to make sure the bird's face (especially the eyes) are sharp.
Quick lenses are expensive, but the improvements in auto-focus speeds and smoothness can be worth the cost if you're looking to take your photography more seriously. For most of my wildlife photography, I use the Canon 300mm F4 IS L lens with a 1.4x converter which is absolutlely ideal for what I need. 

In the Field: 
You can use unusual lighting to great effect, but it might not always be what you're looking for! 
  1. Choose your spot: How much you can do this will obviously depend on where you are shooting, and whether you have to stay in a static public hide (as is the case in some nature reserves for example) or whether you have the freedom to move around. Wherever you are though, do make sure and consider your background (is it cluttered? Are there distracting elements?) and the lighting (do you really want your subject to be backlit? Is the target area in bright sunshine or shade?) as well as a good view of the birds you are wanting to photograph. It’s a massive disappointment to find out that you've nailed an in-flight shot, but the shot is ruined by a bit of brightly-coloured litter in the background or too much contrast.
  2. Just Watch: Unless an amazingly rare species pops up or something really unusual is happening, it’s worth spending a bit of time just watching your birds fly. Get used to watching their flight patterns and their general behaviours before you pick up your camera. Most animals display a relatively limited range of behaviours and it's usually possible to learn to predict which actions will precede a fight, take-off, diving or feeding for example. Similarly, different species will fly in very different ways - a heron has a 'lazy', slow flight style, whereas swallows are fast and far more erratic, but will congregate around specific feeding areas. A little bit of patience early on will mean you are in a much better position to predict when and where you are likely to get the shot. Shooting a couple of frames at exactly the right moment is usually better than just keeping your finger on the shutter button taking the 'spray and pray' approach!
  3. Too fast to track? Catch them at a set point: An alternative to tracking a fast bird, or one with an erratic flight path is to manually focus on a particular spot and wait for the bird to enter it. This is much easier if there is a point that the bird is repeatedly flying to (e.g. a food source) so you have something to pre-set your focus on, but with a combination of narrow aperture (for larger depth of field) and a high shutter speed you can get good results (especially if your camera has good high ISO performance!).

    If a bird is flying too fast to catch, try setting your focus manually to a target (in this case , the baby swallow or the bird feeder) and shoot the bird as it enters the frame. A tripod is very helpful to keep the point of focus in exactly the right place, but these examples were both taken handheld.
  4. Be aware of the whole scene: When you are totally focused on a bird in your viewfinder, making sure it is in the frame, in focus and looking lovely, it is very easy to forget the rest of the frame, and what is happening in the background, or to the light levels. If you shoot using one of the semi-automatic settings like aperture or shutter-priority, the camera should make allowances for any changes in the light, but you have to be aware of changes in the background that will confuse it. For example, when shooting seabirds, they quite often swoop and dive around the boats, meaning that the background is constantly changing between a dark blue sea, and a bright, (though usually grey) sky. It is very easy to get the exposure of the bird wrong as a result, and you need to be prepared to keep adjusting the exposure even as you are panning after the bird. This is one of the major reasons I prefer to use manual mode, because it involves a LOT less effort to keep the subject correctly exposed while tracking it!

    Shooting against the dark sea can throw off automatic metering when the bird flies back up and frames itself against the sky. Using manual exposure settings avoids this problem. 
  5. Finally, practice, practice, practice! This is absolutely the most important thing you can do. Once you know your camera and subject, there is nothing better than getting out and practicing with them.
Looking for more photography tips? Check out my other guides on how to compose a great wildlife photo and how to take photographs at sea.